Well, today is the last day of my first 31 Days Challenge. I didn't accomplish everything I wanted to show you all, but we accomplished a lot in our lives! And I hope I've showed you a little something along the way. I hope you'll stay with me as we continue on this journey. I've still got a lot left to learn, and hopefully you can continue to learn through our mistakes and victories. Paying our bills on time is one of the most gratifying things I have ever encountered. Losing 12 pounds also didn't suck! I'm not done, this blog isn't done, and I hope you'll keep following along!
I hope every has a fantastic Halloween, no matter how your family celebrates. We'll be taking Captain American and Ms. Kitty out on the town, so everyone keep your fingers crossed for no rain!
This 31 Days Challenge was . . . well . . . challenging. Not only do I work full time, I'm a full time mom, wife, and student, so keeping up with posting everyday just wasn't in the cards for me. I didn't want to prepare anything in advance, because I wanted you to live it right along with us. Changing our spending habits was and will remain to be not easy. It's a daily struggle to go from eating out 4 or more times a week, to eating at home. But I am thrilled with the progress we've made so far.
I hope you'll stick around!
--Kate

Wednesday, October 31, 2012
Monday, October 29, 2012
31 Days to Financial Freedom, Day 29: Percentages
I was watching my usual Financial marathon yesterday, including one DVRed episode of the Suze Orman Show, and two episodes of Till Debt do us Part. The host of TDDUP was talking about her "Life Pie", and I jotted down some quick notes because I thought it was very interesting. Here's Gail's Life Pie:
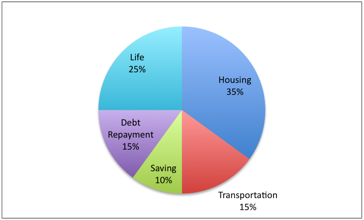
According to Gail, this is where your money should be going every month. I wanted to see how our finances matched up with what Gail said we should do. I sat down this morning to go through our budgeted amounts, and was kind of at a loss of where to start. I Googled her Life Pie, and guess what I found? A website that will do it for me! Shut the front door!
http://www.gailvazoxlade.com/resources/interactive_budget_worksheet.html
I plugged in our information, and was slightly surprised that we were spending 165% of our income, and that our housing alone was 65% of our income. Say whhaaaaaaat? And then I figured out that was because I only put it half of our income. Doy!
I entered in all our information, and this is what the website told me:
Our total housing costs were $789, or 15.36%. It should be 35%.
Our total transportation cost was $679, or 13.22%. It should be 15%.
Our total life cost was $1,241, or 24.16%. It should be 25%.
Our total debt cost was $150, or 2.92%. It should be 15%.
Our total savings was $567, or 11.05%. It should be 10%.
We're spending 66.72% of our income.
There are a few reasons this makes me feel better. First, we're spending within our means, finally. Second, I was concerned that our house was too expensive, and that's the reason we weren't getting ahead. Seeing that we are way under our housing costs for the month is fantastic. It also lets me know that I am on the right track, and where I should focus my efforts. I have decided to make it a goal for November to pay off a majority of our debt.
Medical Bill #1: $390
Medical Bill #2: $359
Medical Bill #3: $450
Collection: $1,000
Mom: $1,000
I'll be honest, I haven't been able to make a payment on any of these bills in quite some time, with the exception of a $50 check I wrote to my mom last Friday. I've been more concerned with paying my regular bills on time. Two of those bills are already in collections, and another one is dangerously close to going there. I'm hoping to combine Medical Bills 1 and 2 together and make one monthly payment on them. Until I get #3 paid off, we can't go to the dentist. #4 has already gone to collections and "dinged" my husband's credit score, so I'm not in as much of a hurry to pay that off. I also want to prove to my mother that we're being responsible now, so that includes monthly payments to her as well. I've rearranged our November budget a bit to accommodate for more spending on debt, and I'll keep you updated on how it's going.
I hope you'll use the website above to see how you're doing!
Friday, October 26, 2012
31 Days to Financial Freedom, Day 26: Planning
This week, I've been putting together our budget, bills, and menu plan for November. It's kind of weird how much I look forward to doing this every month! The first thing I do is put together our expected bills for November, including an estimate of how much they'll be and when they are due. I keep this as a working Microsoft Word document. When I pay one bill, I move it down on the document to the December expenses, that way I'm not having to go back through my register to figure out when bills are due. Here is our November estimated expenses:
November Bills
11/1 Mortgage $618.54
11/1 A Paycheck $400
11/1 A Fuel $50
11/1 K Fuel $30
11/2 K Paycheck $950
11/2 Savings $240
11/2 Daycare $112
11/5 Student Loan $62.74
11/6 Satellite $54.56
11/7 Groceries $100
11/8 A Paycheck $400
11/8 A Fuel $50
11/8 K Fuel $30
11/9 Daycare $115
11/10 Internet $54.98
11/13 Car Insurance $94.87
11/14 Groceries $100
11/15 A Paycheck $400
11/15 A Fuel $50
11/15 K Fuel $30
11/16 Student Loan $59.76
11/16 Daycare $115
11/16 K Paycheck $950
11/16 Savings $240
11/16 Car Payment $283.61
11/21 Groceries $100
11/22 Utilities $180
11/22 A Paycheck $400
11/22 A Fuel $50
11/22 K Fuel $30
11/22 Mom $50
11/23 Daycare $112
11/24 Gas $40
11/27 Cell phone $103
11/28 Groceries $100
11/29 Netflix $17
11/29 A Paycheck $400
11/29 A Fuel $50
11/29 K Fuel $30
11/30 Daycare $115
11/30 K Paycheck $950
11/30 Savings $240
Also at the top of the page I keep a running balance so I know if I'll have to shift how much we spend on groceries or gas. I also keep track of how much I have to pay daycare every week on this document. It's always $100 a week for #2 (unless there's a no-pay-day), but #1's bill changes, depending on how often he gets off the bus there.
After I do our expenses, I create a new monthly budget on Microsoft Excel. Items change month-to-month, depending on how many weeks are in the month. For example, I get paid three times in November, and A gets paid five times in November, which means we'll put gas in our vehicles five times, versus the four we normally have. Make since? This makes our gas budget for the month go up from our gas budget for October.
I'm still working on our menu plan for November. We still have a little meat left, but I need to do an inventory this weekend to see what we have. Also, a friend I have at work has a freezer full of meat that she's not eating, so she's offered it to us. She bought a half a cow last year, then all her kids moved out of her house!
In almost every other aspect of my life, I have always been a planner. Finances were always a place I feel short on that planning aspect. Planning out the month in advance lets us know that we're still not completely on track, because we still can't afford to pay our car payment when it's due. It shows what weeks we'll fall short on, and where we can afford to take some wiggle room, especially for Christmas. This is the first month in a long time that I'll be able to pay our mortgage payment on the due date. That feels pretty darn good!!
So, what do you do to plan out the month in advance? Have you adopted a budget or menu planning for November? How about a Christmas spending limit?
Thursday, October 25, 2012
31 Days to Financial Freedom, Day 25: Bourbon Chicken
I had been craving bourbon chicken from the Chinese food place in the mall for a very long time, and by Monday I wanted it so bad I was coming up with excuses to go to the mall an hour away from our house. Instead of driving 120 miles for chicken, I decided to make my own. I had everything I needed in the house already with the exception of apple cider vinegar, so I decided Monday night was the night.
I fed the kiddos some grilled cheese and soup, because I wasn't going to fight with them to eat something I didn't think they would like. #1 had tried bourbon chicken before and didn't care for it, and I'm not in the habit of making things for dinner I know my kids won't enjoy.
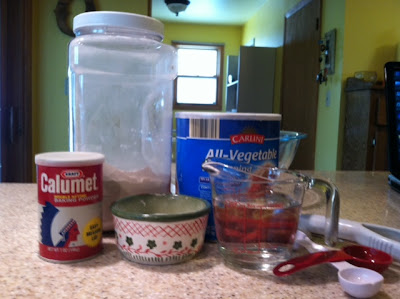
Ingredients:
3 - 5 Chicken breasts
1 garlic clove, or a sprinkling of garlic powder
1/4 tsp ginger (I used ground ginger)
1/4 tsp crushed red pepper flakes
1/4 c. apple juice
1/4 c. light brown sugar
2 tbsp ketchup
2 tbsp apple cider vinegar
1/2 c. water
1/4 c. soy sauce
I used the frozen boneless skinless flavorless chicken that comes in the bags for this particular meal. Fancy, I know. I had five breasts left, and I cut them into bite size pieces. In a bowl, I added all the ingredients. I didn't use a whole garlic clove because I was afraid it would burn, so I just used a sprinkling of garlic seasoning. I also found out that I didn't have any crushed red pepper flakes, so I just used a shake of hot sauce. I whisked the ingredients together, then marinated the chicken in it for about 30 minutes. You could also do that in the morning and marinate it all day, but the chicken wasn't thawed in the morning, and my mornings are crazy enough, thank-you-very-much.

I took the chicken out of the marinade and put it into a hot skillet with vegetable oil. I browned the chicken, then added the marinade. At first I was concerned because the chicken was an odd color and the marinade was just bubbling, but then it started to thicken and reduce, and the chicken slowly started to turn the right color! I had it on the stove top for about 20 minutes, and it looked like this:


I fed the kiddos some grilled cheese and soup, because I wasn't going to fight with them to eat something I didn't think they would like. #1 had tried bourbon chicken before and didn't care for it, and I'm not in the habit of making things for dinner I know my kids won't enjoy.
Ingredients:
3 - 5 Chicken breasts
1 garlic clove, or a sprinkling of garlic powder
1/4 tsp ginger (I used ground ginger)
1/4 tsp crushed red pepper flakes
1/4 c. apple juice
1/4 c. light brown sugar
2 tbsp ketchup
2 tbsp apple cider vinegar
1/2 c. water
1/4 c. soy sauce
I used the frozen boneless skinless flavorless chicken that comes in the bags for this particular meal. Fancy, I know. I had five breasts left, and I cut them into bite size pieces. In a bowl, I added all the ingredients. I didn't use a whole garlic clove because I was afraid it would burn, so I just used a sprinkling of garlic seasoning. I also found out that I didn't have any crushed red pepper flakes, so I just used a shake of hot sauce. I whisked the ingredients together, then marinated the chicken in it for about 30 minutes. You could also do that in the morning and marinate it all day, but the chicken wasn't thawed in the morning, and my mornings are crazy enough, thank-you-very-much.

I took the chicken out of the marinade and put it into a hot skillet with vegetable oil. I browned the chicken, then added the marinade. At first I was concerned because the chicken was an odd color and the marinade was just bubbling, but then it started to thicken and reduce, and the chicken slowly started to turn the right color! I had it on the stove top for about 20 minutes, and it looked like this:

I used too much oil in the pan as you can tell by the picture. The brown sugar caramelized on the chicken and gave it the color I associate with bourbon chicken. We cooked some white rice to go with it. I'll be honest, I was expecting to throw this out and have peanut butter and jelly sandwiches for dinner. Hence my shock when it ended up being pretty gosh darn good. Good as the mall's chicken? Is anything better than the mall's chicken? But it satisfied my craving. Plus, it gives me something else to make with the boneless chicken breasts!

Wednesday, October 24, 2012
31 Days to Financial Freedom, Day 24: Tortillas
Homemade flour tortillas . . . if you are buying the stuff in a package at the grocery store, you just don't know what you're missing! It's easy. It's cheap. And it's delicious. The next Taco Tuesday, I dare you to make your own tortillas!
Ingredients:
3 and 1/2 c. AP flour
1 tsp salt
1/2 tsp baking powder
7 tbsp vegetable shortening or vegetable oil (I used shortening)
1 cup very hot water
Mix first four ingredients together into a bowl. Pour the hot water slowly over the mixture while using your hand to mix it together. Yes, this part hurt a little, but only for a second.

Knead the mixture for three minutes in the bowl once the water has been added, forming into a giant ball.

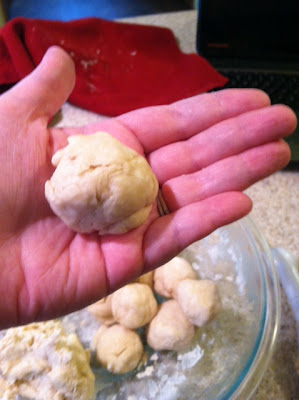
Cover the dough and let it sit for 15 minutes. Once 15 minutes are up, separate the dough into small portions. I started out using my cookie scoop, but switched to just grabbing small sections of a dough. Roll them into balls and cover until ready to use them.
At this point, I started browning the taco meat. I add water to my taco meat once it's cooked to create a sauce, and I cooked the tortillas while I was waiting for the water to cook off. See my taco recipe here!
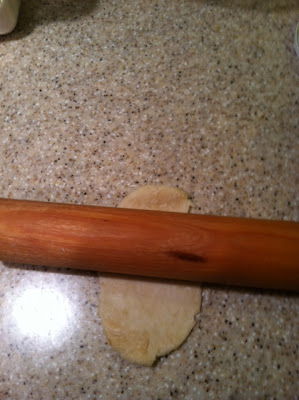
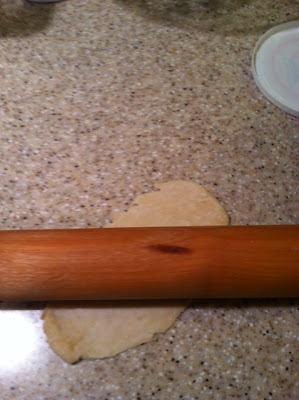
Using a rolling pin, roll the dough out into the shape of an oval. The first tortilla I made was too thick. This will make between 15 and 20 tortillas, so use this opportunity to experiment with the thickness of the tortilla. For us, it was the right thickness when we could see the pattern of our counter top through the dough.
To roll it out, first roll into an oval shape, turn the dough 45 degrees, and repeat until whatever shape you want it to be.
Tortillas are not all supposed to be the same size and shape! I made three tortillas that were smaller for the kiddos. Husband and I developed an assembly line for this part. He would roll the tortilla, then I'd cook it while he was rolling another one. I cooked one tortilla at a time in a hot non-stick skillet.
Put your tortilla into your pan. After about 5 to 7 seconds, air bubbles will start to form.
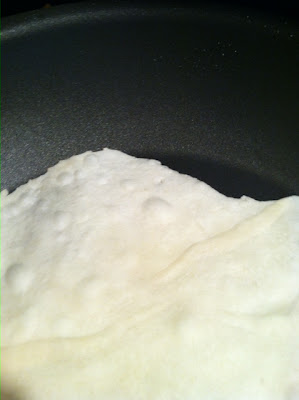
Flip the tortilla once you see the bubbles. Once flipped, the tortilla will fill with air. Use your spatula to flatten it as much as you can.
 After 10 seconds or so, check the bottom of your tortilla. Are there brown marks on it? Flip it over! Cook for another couple of seconds to get brown spots on the other side, then remove it from the heat. It took me less time to cook the tortilla than it did to roll out the next one to cook!


Ingredients:
3 and 1/2 c. AP flour
1 tsp salt
1/2 tsp baking powder
7 tbsp vegetable shortening or vegetable oil (I used shortening)
1 cup very hot water
Mix first four ingredients together into a bowl. Pour the hot water slowly over the mixture while using your hand to mix it together. Yes, this part hurt a little, but only for a second.

Knead the mixture for three minutes in the bowl once the water has been added, forming into a giant ball.

Cover the dough and let it sit for 15 minutes. Once 15 minutes are up, separate the dough into small portions. I started out using my cookie scoop, but switched to just grabbing small sections of a dough. Roll them into balls and cover until ready to use them.

At this point, I started browning the taco meat. I add water to my taco meat once it's cooked to create a sauce, and I cooked the tortillas while I was waiting for the water to cook off. See my taco recipe here!
Using a rolling pin, roll the dough out into the shape of an oval. The first tortilla I made was too thick. This will make between 15 and 20 tortillas, so use this opportunity to experiment with the thickness of the tortilla. For us, it was the right thickness when we could see the pattern of our counter top through the dough.
To roll it out, first roll into an oval shape, turn the dough 45 degrees, and repeat until whatever shape you want it to be.

Start rolling it into an oval . . .

Turn 45 degrees, and roll again.
Tortillas are not all supposed to be the same size and shape! I made three tortillas that were smaller for the kiddos. Husband and I developed an assembly line for this part. He would roll the tortilla, then I'd cook it while he was rolling another one. I cooked one tortilla at a time in a hot non-stick skillet.
Put your tortilla into your pan. After about 5 to 7 seconds, air bubbles will start to form.

Bubbles! Bubbles! My bubbles.
Flip the tortilla once you see the bubbles. Once flipped, the tortilla will fill with air. Use your spatula to flatten it as much as you can.


Mmmmm . . . delicious.
This made about 17 tortillas for us. We ate seven tortillas for dinner, then my husband ate another taco that night as a midnight snack. The tortillas have flavor, so you can use them for more than just tacos! I had a wrap on one the next day, Piglet 1 had a "pizza shell" for lunch, and my husband put peanut butter and jelly on them the next day. I don't think we'll ever go back to buying tortillas in the bag. Seriously - sooooo good! Try it!
Tuesday, October 23, 2012
31 Days to Financial Freedom, Day 23: Last week in review
I lied! The homemade tortilla tutorial will be tomorrow's post. In flipping through my pictures, I realized I didn't take any pictures of the actual tacos done, but since we're making them again tonight (very excited!), I'll take some more pictures so you can see the finished product.
I do this thing where I audit my spending at the end of every week. For me, a week runs from Sunday to Saturday, just for simplicity sake. This is an audit of our spending from October 14 - October 20.
Our income for the week was $1305.44, which was under for what I had budgeted. My husband came home early from work sick on day, cutting his paycheck by about $70. Not good!
We spent $68.52 on groceries, $31.48 under budget. Woohoo!
We reached our budgeted amount for snacks this week. In total, we spent $6.02. This was mainly because of the baseball games I was watching every night. $1.69 will buy my husband and I two 32 oz. sodas. OR we could buy a 2 liter for $1. Doy!
We have also reached our budgeted amount for eating out for October. We bought pizza one night, and then ate out one other time. We also purchased Chinese food, but we were reimbursed for that in cash. Free meal!
I also forgot to pay our daycare bill that week. Duh! So two checks will be on the next week's register.
Our car payment was $34 more this month because we had previously made two late payments (after the 10 day grace period), and had to pay late fees. I love throwing money away!
Income: $1,305.44
Expenses: $1236.92
So it wasn't a super successful week, but it wasn't a fail either! Auditing our expenses really helps me to see where we're at with our money, and how we can do better. I hope you'll try it with your own spending!
I do this thing where I audit my spending at the end of every week. For me, a week runs from Sunday to Saturday, just for simplicity sake. This is an audit of our spending from October 14 - October 20.
| Debit | -21.22 | Groceries - IGA | 10/14/2012 | 354.19 |
| Debit | -49.11 | Fuel - A | 10/14/2012 | 305.08 |
| Auto | -94.87 | Car Insurance | 10/15/2012 | 210.21 |
| Debit | -1.69 | Snacks | 10/15/2012 | 208.52 |
| Auto | -59.76 | Student Loan - A | 10/16/2012 | 148.76 |
| Debit | -1.69 | Snacks | 10/15/2012 | 147.07 |
| 1099 | -40.00 | Babysitting | 10/15/2012 | 107.07 |
| Debit | -32.44 | Fuel - Me | 10/17/2012 | 74.63 |
| Debit | -1.69 | Snacks | 10/17/2012 | 72.94 |
| Deposit | 331.47 | Paycheck - A | 10/18/2012 | 404.41 |
| Debit | -33.69 | Groceries - Walmart | 10/18/2012 | 370.72 |
| Debit | -1.79 | Groceries - D&R (AP Flour) | 10/18/2012 | 368.93 |
| Debit | -6.82 | Groceries - IGA | 10/18/2012 | 362.11 |
| Debit | -5.00 | Groceries - Family Express (Milk) | 10/18/2012 | 357.11 |
| Debit | -3.21 | Eating out - Pizza Hut | 10/18/2012 | 353.90 |
| Debit | -4.71 | Eating out - McDonalds | 10/18/2012 | 349.19 |
| Auto | -317.61 | Car Payment | 10/18/2012 | 31.58 |
| Deposit | 973.97 | Paycheck - Me | 10/19/2012 | 1005.55 |
| Auto | -200.00 | First Federal | 10/19/2012 | 805.55 |
| Auto | -40.00 | Account #2 | 10/19/2012 | 765.55 |
| Debit | -16.77 | Eating out - Pizza Hut | 10/19/2012 | 748.78 |
| Debit | -24.60 | Diapers | 10/20/2012 | 724.18 |
| Debit | -29.28 | Joann Fabrics - Halloween | 10/20/2012 | 694.90 |
| Debit | -11.24 | Lowe's (Dryer) | 10/20/2012 | 683.66 |
| Debit | -191.89 | Couch | 10/20/2012 | 491.77 |
| Debit | -0.95 | Snacks | 10/20/2012 | 490.82 |
| Debit | -25.00 | Fuel - Me | 10/20/2012 | 465.82 |
| Debit | -6.93 | Ace (Dryer) | 10/20/2012 | 458.89 |
| Debit | -14.96 | Halloween | 10/20/2012 | 443.93 |
| 1100 | -29.00 | Chinese Food | 10/20/2012 | 414.93 |
| Deposit | 29.00 | Deposit for Chinese Food | 10/20/2012 | 443.93 |
Our income for the week was $1305.44, which was under for what I had budgeted. My husband came home early from work sick on day, cutting his paycheck by about $70. Not good!
We spent $68.52 on groceries, $31.48 under budget. Woohoo!
We reached our budgeted amount for snacks this week. In total, we spent $6.02. This was mainly because of the baseball games I was watching every night. $1.69 will buy my husband and I two 32 oz. sodas. OR we could buy a 2 liter for $1. Doy!
We have also reached our budgeted amount for eating out for October. We bought pizza one night, and then ate out one other time. We also purchased Chinese food, but we were reimbursed for that in cash. Free meal!
I also forgot to pay our daycare bill that week. Duh! So two checks will be on the next week's register.
Our car payment was $34 more this month because we had previously made two late payments (after the 10 day grace period), and had to pay late fees. I love throwing money away!
Income: $1,305.44
Expenses: $1236.92
So it wasn't a super successful week, but it wasn't a fail either! Auditing our expenses really helps me to see where we're at with our money, and how we can do better. I hope you'll try it with your own spending!
Monday, October 22, 2012
31 Days to Financial Freedom, Day 22: Money is still tight
My husband and I have been talking lately about how much we're saving. $240 of my paycheck is now direct deposited into our savings account, for a total of $480 per month. I've been looking around online, and the majority of the websites I have found encourage people to put 10% of their paycheck in the savings account, but we're closer to about 13%. So are we saving too much?
Even though we've cut eating out by a big margin, as well as other extra items, we're still coming in way under what I would like this month. Trying to save up a month's worth of expenses in our checking account is proving to be more difficult than I thought. At the end of this month we should only have $100 left over. That's less than we had leftover in September, which means we've spent all the money we made in October and then some. Not cool.
Extra expenses we've had so far this month:
Extra box of diapers - $20
Supplies to install an electric dyer - $18
Halloween - $54
Couch - $192
In looking ahead to November, I already know that we will not be able to make our car payment on time (again). I also know that Christmas is coming up, and even though we're scaling way back, there will still be extra expenses tied to that. I'm wondering if we should cut the amount of money we're saving for the time being until we have a bit more in our checking account. But then I'm scared that if it's in there, we'll spend it just like we always used to do!
I guess right now I'm feeling discouraged. It seems like we're doing everything right, but there's still not enough money left at the end of the month. My husband also told me this weekend that instead of getting overtime like we had expected, there's talk about cutting his hours at the beginning of next year. Aaarrrggghhh!!!
I'm sorry today's post is kind of a downer! Tomorrow I'll show you how to make handmade tortillas. Yum!
Sunday, October 21, 2012
31 Days to Financial Freedom, Day 21: Cookies
Hello, folks. Thanks so much for sticking with me these past few days. There has been a "sinus thing" going around the hospital where I work, and it is kicking my booty! I am so ready for this to icky-ness to be over.
Today we picked up the couch that has been sitting at the furniture store for almost a month. We were finally able to save up enough money to pay it off, but that of course means that our savings account is pretty much empty . . . again. Suck-o.
Anyway, remember the pumpkin pie I made last weekend? It was delicious! I had about a cup of pumpkin puree left, and I was scouring my recipes to try to find one that only called for 1 cup of puree. Another issue is that our grocery budget for the week has been spent, so whatever I made, I had to have all the ingredients already in our pantry.
The daycare where the kiddos attend was having a "raise the roof" party on Friday, and I had planned to make chocolate chip cookies for the volunteers, but then I came down with the plague and couldn't deliver. So what's a girl to do? Pumpkin chocolate chip cookies!
Ingredients:
2 sticks (1 cup) butter, room temperature
1 cup white sugar
1 cup brown sugar
2 eggs
1 tsp vanilla extract
1 cup pumpkin puree
3 cups AP flour
2 tsps baking soda
1/2 tsp salt
1 tsp ground cinnamon
1/2 tsp ginger
1/4 tsp nutmeg
1/4 tsp allspice
1 bag milk chocolate chips, or between 12 and 14 ounces
Preheat oven to 350 degrees. Beat the butter until smooth, then add both kinds of sugar. Mix until fully incorporated and fluffy. Mix in eggs one at a time, then add vanilla and pumpkin puree. Action shot!

I stopped the mixer every so often to scrap the bottom and sides of the bowl. Use your best judgement! In a separate bowl, mix together flour, baking soda, salt, and spices.

Add to mixing bowl slowly, less ye make giant mess. Try not to eat the dough at this point. It will smell ah-mazing.

Once incorporated, stir in your chocolate chips. Scoop the cookies on your greased up cookie sheets, or cookie sheets with parchment paper on them. This will make a crap-ton of cookies. How much is a crap-ton? About 54 cookies. And I made mine pretty large.

Bake for 12-15 minutes, or until yummy-golden brown around the edges. Cool for a minute or two on the cookie sheet before moving to your wire rack to let cool the rest of the way. The pumpkin and additional spices does not overpower the taste of the cookies. They really are delicious! I hope you'll try them!

Thanks for hanging in there with me the past few days. Hopefully the plague has passed on! I've got plenty more stuff coming up in the next few days, including the kiddos' Halloween costumes, and some crafts I'll be working on tomorrow night if the Cardinals lose tonight and they go to Game 7. I'm off to watch the rest of the sad sad game they've been playing so far tonight.
Thursday, October 18, 2012
31 Days to Financial Freedom, Day 18: Sick Day
Hello. My name is Kate. And I am taking today off. I haven't felt good the past few days, and my daughter is sick, so her and I are going to hang around in our pajamas, sleep when we want, and eat chicken noodle soup.
I just wanted to share my first name with you all. It's not actually Penny. Surprise!
Back to bed I go.
I just wanted to share my first name with you all. It's not actually Penny. Surprise!
Back to bed I go.
Wednesday, October 17, 2012
31 Days to Financial Freedom, Day 17: Pumpkin Pie
Perhaps I've told you, I love autumn. Christmas is my favorite holiday, but autumn is my favorite season. I look forward to it every year, but it's so short, crammed in between 90 degree weather and snow. It never seems to last as long as I want. It doesn't help that we decorate for Christmas the weekend after Thanksgiving, either.
On Sunday, I did something that I have never done before. I made a homemade pumpkin pie! It didn't turn out perfect, but who really cares? It was (mostly) delicious, and not that scary to make. Mind you, before this I had never so much as made my own pie crust. So making my own pie crust and homemade pumpkin goodness to go inside seemed like a daunting task. I'm here to tell you that it isn't. My husband purchased two pie pumpkins a few weeks ago for $.50 a piece. That's much cheaper that the pumpkin in the can, and I'm pretty sure I ended up with more pumpkin than what I would get in the can! Plus, I know there are no preservatives, and I saw the pumpkin that the puree came from.
Ingredients:
Dough:
1 and 1/4 cups AP flour
2 tsps sugar
1/8 tsp salt
1/2 cup really really super duper cold butter (that's 1 stick), diced
1 large egg, lightly beaten
Flour for rolling the dough
Pumpkin Filling Goodness of Epic Proportions:
2 cups pumpkin puree
3/4 cup packed light brown sugar
3 eggs, lightly beaten (or forget to do this part, and just mess 'em up a bit when they're in the bowl)
1 and 1/4 cup half and half or whipping cream (I used whipping cream)
1 and 1/2 tsps ground cinnamon
1/2 tsp ground ginger
1/2 tsp ground allspice
1/4 tsp freshly found nutmeg
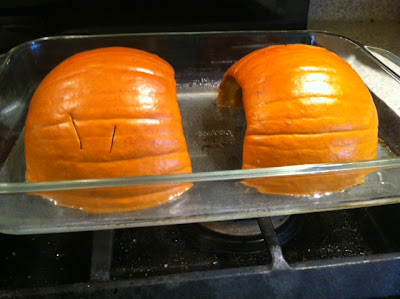
So, the first thing you'll need to do is cook your pumpkin. When Piglet 2 was just a wee tot, I decided to make our own baby food. It really wasn't that hard, and I enjoyed doing it. Last autumn when the pumpkins were on sale, we would use those because they were so inexpensive. I cooked the pumpkin the same way we cooked her squash and pumpkins last year. Start with a sharp knife, a cutting board, your compost bucket, and (of course) your pumpkin.

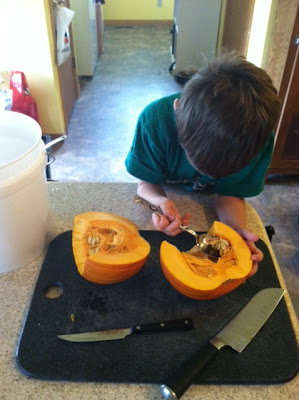
Cut the top off your pumpkin like you would for a jack-o-lanter, then cut your pumpkin in half. Next, you'll need to scrap out all the seeds and other "bits" not suitable for pie. Have a cutie pretend to help you, then abandon you because it's too "goopy". Leaving sharp knives around where you child can easily cut their fingers off is optional. I wanted to do something with the pumpkin seeds, but . . . well, I didn't. Maybe we'll grow pumpkins in our compost pile!
Once the pumpkin guts have been scooped, lay them face down in a baking dish with about half an inch of water in it.
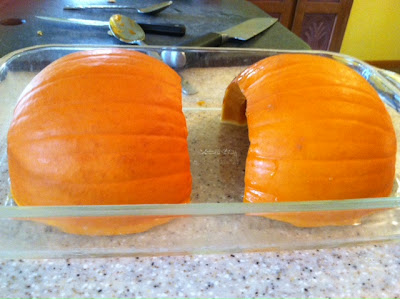
Bake at 350 degrees F for about 45 minutes to an hour, or until a knife inserted into it goes in smooth. Also, ignore the dirty stove top of the blogger and just focus on the pretty orange color of the pumpkin.
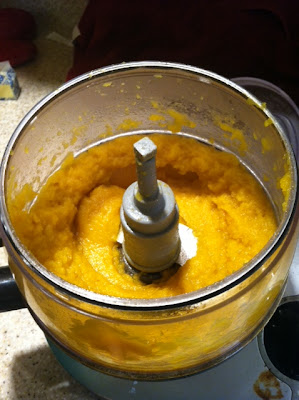
From experience: while waiting for the pumpkin to cool so you'll still have finger prints after the pie is made, take the pumpkin out of the water. It will absorb the water if you let it stay in the pan. Once it's cooled down enough for you to touch it without regretting the day you were born, peel the inside goodness away from the outside not-so-goodness, add to your food processor, and pulse until it's this consistency, about 12 - 15 times:
Add your flour, sugar, and salt to the food process, and pulse until combined. Add the butter and pulse until it looks something like this:
Then add your egg and pulse until combined, but not formed into a dough ball yet. I turned it out onto my floured bar and brought it together by hand. Add more water if needed, but make sure you really work it for a while. I didn't have to add anything to mine. Form it into a disk, wrap in plastic wrap, and REFRIGERATE at least one hour. Do not try to do it quicker by putting it into the freezer. Because then it will crack and you'll have to piece together your pie in the pan and your husband will make fun of you. I didn't have plastic wrap, so I used a zip lock bag.


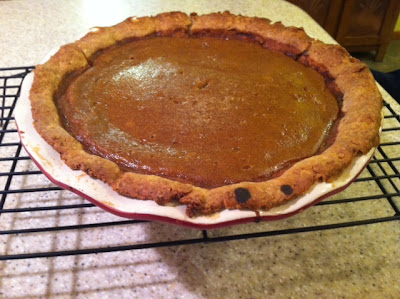

On Sunday, I did something that I have never done before. I made a homemade pumpkin pie! It didn't turn out perfect, but who really cares? It was (mostly) delicious, and not that scary to make. Mind you, before this I had never so much as made my own pie crust. So making my own pie crust and homemade pumpkin goodness to go inside seemed like a daunting task. I'm here to tell you that it isn't. My husband purchased two pie pumpkins a few weeks ago for $.50 a piece. That's much cheaper that the pumpkin in the can, and I'm pretty sure I ended up with more pumpkin than what I would get in the can! Plus, I know there are no preservatives, and I saw the pumpkin that the puree came from.
Ingredients:
Dough:
1 and 1/4 cups AP flour
2 tsps sugar
1/8 tsp salt
1/2 cup really really super duper cold butter (that's 1 stick), diced
1 large egg, lightly beaten
Flour for rolling the dough
Pumpkin Filling Goodness of Epic Proportions:
2 cups pumpkin puree
3/4 cup packed light brown sugar
3 eggs, lightly beaten (or forget to do this part, and just mess 'em up a bit when they're in the bowl)
1 and 1/4 cup half and half or whipping cream (I used whipping cream)
1 and 1/2 tsps ground cinnamon
1/2 tsp ground ginger
1/2 tsp ground allspice
1/4 tsp freshly found nutmeg
So, the first thing you'll need to do is cook your pumpkin. When Piglet 2 was just a wee tot, I decided to make our own baby food. It really wasn't that hard, and I enjoyed doing it. Last autumn when the pumpkins were on sale, we would use those because they were so inexpensive. I cooked the pumpkin the same way we cooked her squash and pumpkins last year. Start with a sharp knife, a cutting board, your compost bucket, and (of course) your pumpkin.

Cut the top off your pumpkin like you would for a jack-o-lanter, then cut your pumpkin in half. Next, you'll need to scrap out all the seeds and other "bits" not suitable for pie. Have a cutie pretend to help you, then abandon you because it's too "goopy". Leaving sharp knives around where you child can easily cut their fingers off is optional. I wanted to do something with the pumpkin seeds, but . . . well, I didn't. Maybe we'll grow pumpkins in our compost pile!

Once the pumpkin guts have been scooped, lay them face down in a baking dish with about half an inch of water in it.

Bake at 350 degrees F for about 45 minutes to an hour, or until a knife inserted into it goes in smooth. Also, ignore the dirty stove top of the blogger and just focus on the pretty orange color of the pumpkin.

From experience: while waiting for the pumpkin to cool so you'll still have finger prints after the pie is made, take the pumpkin out of the water. It will absorb the water if you let it stay in the pan. Once it's cooled down enough for you to touch it without regretting the day you were born, peel the inside goodness away from the outside not-so-goodness, add to your food processor, and pulse until it's this consistency, about 12 - 15 times:

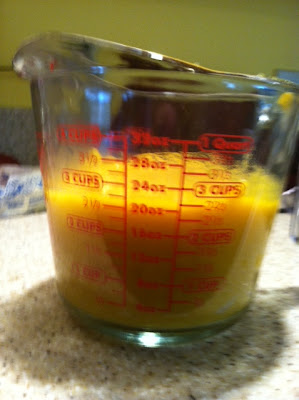
For this recipe, you'll need about 2 cups of pumpkin. As you can see, one whole pumpkin gives about three cups. Hmmm . . . I wonder what I'll do with the leftover cup of pumpkin puree. Oh wait, that post is coming up soon. Freeze the leftover puree into zip lock bags in one cup increments. You can keep it in the freezer for years three months. I swear I don't still have frozen baby food in my freezer from 2011. *Cough*

Now on to the pie crust! I've watched Ina Garten make many a pie crust in her food processor and it seems so easy. So that's how I made mine. And I called her up to tell her how great it turned out, and how excited I was that I finally did it after all those times she explained it to me. *Silence.* Am I the only one who pretends Food Network chefs are talking to me?
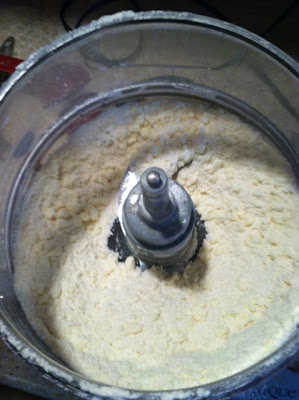
The first thing I did when making my pie crust was to cut my 1 stick of butter. I diced it, then put it in a bowl and into the freezer while I got everything else together for the dough. If Ina taught me anything, it's that the butter needs to be cold.
Add your flour, sugar, and salt to the food process, and pulse until combined. Add the butter and pulse until it looks something like this:

Then add your egg and pulse until combined, but not formed into a dough ball yet. I turned it out onto my floured bar and brought it together by hand. Add more water if needed, but make sure you really work it for a while. I didn't have to add anything to mine. Form it into a disk, wrap in plastic wrap, and REFRIGERATE at least one hour. Do not try to do it quicker by putting it into the freezer. Because then it will crack and you'll have to piece together your pie in the pan and your husband will make fun of you. I didn't have plastic wrap, so I used a zip lock bag.

After it's thoroughly chilled, start rolling it our on a floured service. You want it to be about 12 circle and 1/8 of an inch thick.

Then transfer it to your pie pan. I did not grease my pie pan, and everything worked out fine. I did freeze my pie crust, and it kind of turned into a hot mess.

See? Once your have your dough in the pan, freeze it for 30 minutes. The recipe I was following for the dough told me to "blind bake" my pie crust by putting aluminum foil over it with beans inside. I don't like beans. I don't have beans in my house. So instead I poked the H E double hockey sticks out of it with a fork and hoped for the best. Guess what? Turned out juuuuuust fine. I added aluminum foil to the top, and put it in a 400 degree preheated oven for 20 minutes, then removed the aluminum foil and cook until golden brown, about another 10 minutes. Cool the pie on a rack and lower your temperature to 350 degrees.

Once the pie crust was done, I started working on the pumpkin filling goodness. Mix together the pumpkin, brown sugar, eggs, half-and-half/heavy whipping cream, spices and salt until smooth. Pour the filling into the crust and bake until the pie is set, which ended up being about 80 minutes for me.

Add homemade whipped cream if your heart so desires. Just take two cups of the heavy whipping cream and whisk it by hand or with a mixer until it forms stiff peaks. Once it's almost there, add two or three tablespoons of confectioner's sugar and a splash of vanilla. Super easy to do, and the leftovers are delicious in your coffee the next day. The crust looks darker than it actually was, but it was a little too dark for my liking.

Here's what I'll change the next time I do it:
- I will not prebake the crust. A lady in my office is a great baker, and she said because the pie takes so long to cook, there's no need to preback the crust. It did get a little browner than I would have liked, but it was good nonetheless.
- I will use half lard, half butter for the next pie crust. The same baking guru told me there were two reasons my dough cracked horrible - either because I froze it for half the time, or because the crust was too "rich". She says she always used half lard, half butter, and her crusts turn out amazing (I know from experience). I happen to have a large tub 'o lard in my fridge, and will do this next time.
- I will not let the pumpkins sit in the water while it cools. It should have only taken about 60 minutes for the pie to bake, but because of the added water, it took a little while longer.
- I will wait for the pumpkin to cool before I touch it. I will wait for the pumpkin to cool before I touch it. I WILL wait for the pumpkin to cool before I touch it. I'll probably not wait for the pumpkin to cool before I touch it, and will end up with a big blister on my index finger again.
- I will find something to do with the insides of the pumpkin that does not involve roasting pumpkin seeds, because I hate roasted pumpkin seeds. Any ideas?
Tuesday, October 16, 2012
31 Days to Financial Freedom, Day 16: Past vs. Present
This marks the halfway point for this 31 Days journey, and the 46th day that our family and I changed our ways for the better. We are in such a better place today than we were on August 31st.
So, I wanted to show you exactly was has changed between August 16 and October 16. Here is our spending from August 1 - August 16, and October 1 - October 16.
Groceries:
I have no idea how we spent that much money in groceries in the first 16 days of August, especially considering how much we also spent eating out. This is the result of not properly planning our meals, not having a budget, and not having a shopping list! We made 17 trips to the grocery store in August, meaning I was having my husband buy food that we needed for dinner that night, versus either using what we already had in the house, or having him shop once a week. We've made nine trips to the grocery store so far in October, but that's mostly trips for just milk or just bread (yes, I'm slacking on the homemade bread) because we go through those pretty quickly.
Average cost per day in August: $23.98
Average cost per day in October: $ 5.56
Gas:
We made one trip about 60 miles south, and another trip about 120 miles south during this time in August, which is why our gas amount was so high. That's an extra 360 miles on the mini-van and in the gas tank.
Average cost per day in August: $15.90
Average cost per day in October: $10.00
Eating Out:
Again, how did we spend this much eating out and groceries? On more than one occasion, we ate out for lunch and dinner!
Average cost per day in August: $12.99
Average cost per day in October: $ 1.02
Bills:
In August, our daycare weekly tuition was $168, and that was reduced to $115 in October due to our son starting kindergarten. August's bill amount didn't include our mortgage payment. This is how messed up our priorities were! The only bills I had paid at this time in August were one previous month of Pen's student loan, another payment on another of his student loans, the utilities payment from the previous month, out satellite bill (comes out automatically), two weeks of daycare, and our car insurance (again, comes out automatically). So far this month, I've paid our mortgage, 2 weeks of daycare, both of Pen's student loan payments, out satellite payment, and our car insurance.
Average cost per day in August: $54.31
Average cost per day in October: $76.02
Snacks:
*Sigh* Again, this is money spent at gas stations and convenience stores on little stuff that added up! What a complete waste of money.
Average cost per day in August: $ 4.33
Average cost per day in October: $ .45
Shopping:
This includes a $134 trip to Target and a $102 shopping spree at Fashion Bug, along with useless other crap. We went away for a weekend, and I forgot to pack shirts for me, which happens often. My husband says I do this subconsciously so that I have an excuse to go shopping, and I think he's right. October's shopping is for Halloween costumes.
Average cost per day in August: $21.46
Average cost per day in October: $ .62
Savings:
Sure, money went into our savings account, but it also came right back out. Just a reminder, we save $400 per month. $200 comes out of each of my paychecks and goes right into a separate account. Previously, we would have to withdraw all or a portion of that $200 so we wouldn't be overdrawn on our main checking account.
Average cost per day in August: $ 1.98
Average cost per day in October: $12.50
Total Average cost per day in August: $134.95
Total Average cost per day in October: $106.17
Sure, our total average cost per day wasn't all that different, but look at where the majority of our money was going! On food, we were spending an average of $41.30 per day in August! Now we've got that down to $7.03. What a difference! I am so thrilled with our progress. And by doing little stuff like this, it shows me that the changes we are making are really working. Plus, I'm 8 pounds lighter than I was on September 1st!
So, I wanted to show you exactly was has changed between August 16 and October 16. Here is our spending from August 1 - August 16, and October 1 - October 16.
|
Item:
|
August:
|
October:
|
|
Groceries
|
$383.69
|
$88.96
|
|
Gas
|
$254.39
|
$160
|
|
Eating Out
|
$207.78
|
$16.24
|
|
Bills
|
$868.95
|
$1216.30
|
|
Snacks
|
$69.25
|
$7.21
|
|
Shopping
|
$343.36
|
$9.92
|
|
Saving
|
$31.49
|
$200
|
|
|
|
|
|
Total
|
$2158.91
|
$1698.63
|
Groceries:
I have no idea how we spent that much money in groceries in the first 16 days of August, especially considering how much we also spent eating out. This is the result of not properly planning our meals, not having a budget, and not having a shopping list! We made 17 trips to the grocery store in August, meaning I was having my husband buy food that we needed for dinner that night, versus either using what we already had in the house, or having him shop once a week. We've made nine trips to the grocery store so far in October, but that's mostly trips for just milk or just bread (yes, I'm slacking on the homemade bread) because we go through those pretty quickly.
Average cost per day in August: $23.98
Average cost per day in October: $ 5.56
Gas:
We made one trip about 60 miles south, and another trip about 120 miles south during this time in August, which is why our gas amount was so high. That's an extra 360 miles on the mini-van and in the gas tank.
Average cost per day in August: $15.90
Average cost per day in October: $10.00
Eating Out:
Again, how did we spend this much eating out and groceries? On more than one occasion, we ate out for lunch and dinner!
Average cost per day in August: $12.99
Average cost per day in October: $ 1.02
Bills:
In August, our daycare weekly tuition was $168, and that was reduced to $115 in October due to our son starting kindergarten. August's bill amount didn't include our mortgage payment. This is how messed up our priorities were! The only bills I had paid at this time in August were one previous month of Pen's student loan, another payment on another of his student loans, the utilities payment from the previous month, out satellite bill (comes out automatically), two weeks of daycare, and our car insurance (again, comes out automatically). So far this month, I've paid our mortgage, 2 weeks of daycare, both of Pen's student loan payments, out satellite payment, and our car insurance.
Average cost per day in August: $54.31
Average cost per day in October: $76.02
Snacks:
*Sigh* Again, this is money spent at gas stations and convenience stores on little stuff that added up! What a complete waste of money.
Average cost per day in August: $ 4.33
Average cost per day in October: $ .45
Shopping:
This includes a $134 trip to Target and a $102 shopping spree at Fashion Bug, along with useless other crap. We went away for a weekend, and I forgot to pack shirts for me, which happens often. My husband says I do this subconsciously so that I have an excuse to go shopping, and I think he's right. October's shopping is for Halloween costumes.
Average cost per day in August: $21.46
Average cost per day in October: $ .62
Savings:
Sure, money went into our savings account, but it also came right back out. Just a reminder, we save $400 per month. $200 comes out of each of my paychecks and goes right into a separate account. Previously, we would have to withdraw all or a portion of that $200 so we wouldn't be overdrawn on our main checking account.
Average cost per day in August: $ 1.98
Average cost per day in October: $12.50
Total Average cost per day in August: $134.95
Total Average cost per day in October: $106.17
Sure, our total average cost per day wasn't all that different, but look at where the majority of our money was going! On food, we were spending an average of $41.30 per day in August! Now we've got that down to $7.03. What a difference! I am so thrilled with our progress. And by doing little stuff like this, it shows me that the changes we are making are really working. Plus, I'm 8 pounds lighter than I was on September 1st!
Subscribe to:
Posts (Atom)